Wednesday, February 18, 2015

Making babies!

So, I can't even count how many times I have come into my blog to post, and now have some half written blog post saved in my file because something always comes up, and I keep trying to get back to it, but just haven't finished yet! I had some heart healthy kitchen staples that I was going to have posted for Valentines week, but then, well, life just happened, and my kids needed goodies made for parties, valentines made (I did post those!) and between practices, then with wrestling tournaments to go to, time just got away. I'm pretty sure my profile states I have three kids, so any of you moms reading this, I know you understand :0)

So, anyway, I had orders to get done, and I thought I would just throw in a fun post of what I was doing today.....
Making babies!
 I know, I know, your probably like.....

But, seriously, one of my favorite little fondant figures I make are these sweet little babies. 


These are made of fondant/gumpaste and have such intricate detail, and are adorable for baby showers, birthdays, and more. I custom make these, and one of my customers order wants diapers on a few of them, so I have to go make some cute little diapers to cover their bottoms. As you can see, I am half way done, so I have to get back to work! Have a wonderful Wednesday!


Thursday, February 12, 2015

I mustache you a question.....

I mustache you a question.....do you love valentines day?? I do!.... so rolling on with this weeks valentines theme, here are my daughters valentines we are finally finishing up! Soooo cute and super easy!


These are a mix of lips and mustaches, attached to a sucker so when they suck on them you will see their glitter lips or glitter-stache! 

Here is what you need:
~piece of card stock or heavy paper to trace
~foam paper, color of choice. which sticky backing
~suckers
~scissors
~pen


Directions:
Step one- draw your mustache and lips on your card stock paper and cut shapes out.
Step two- trace shapes on the back of the foam, on the sticky paper side
Step three- cut shapes out
Step four- have your child write their valentines names on the paper part on the back
Step five- poke a hole in the middle and put the sucker stick through
Oh, and once they are done with their sucker, they can peel off the backing and still wear the lips or mustache!

We had such a mustach-tic time making these!


Wednesday, February 11, 2015

You color my world Valentine!


So Valentines day is 3 days away, so I thought it would be fun to show you some valentine ideas for your kiddos. We LOVE making homemade valentines, well, I should say my girls and I love to. My oldest is past that stage now! I didn't get pics of all the steps,  but it is super easy.

What you need:

~silicone mold with shapes you want them to be (we had ice cube flower molds that we used)
~different color crayons (new or old)
~baking sheet
~construction paper
~Mounting foam circles, or glue dots
~marker

Directions:
~preheat your oven at 250
~Chop up old crayons in little pieces,  pick out your colors carefully so you get the right color contrast you want. (my oldest daughter was very particular about those!)
~have your child fill silicone molds with crayon pieces all the way to the top, they love this part:0) (they will condense down when melting so don't be scared to overfill a little)
~put silicone mold on baking sheet and put in oven for about 15-25 minutes, until completely melted.
~once melted set on counter for about 15 minutes to cool, then in freezer for another 15 minutes
~when you take them out run some warm water over the back of your mold for a minute and then pop them out! Now aren't they adorable!!!

~OK, now the other part is just as easy. Decide what shape you want your paper part to be and cut out your shapes.
~Now write your saying around the edges, for example we chose: "You color my world Valentine!"
~I wrote the sayings for my daughter on the front side, while she signed her name on the back and wrote a note to each of her friends. Make sure to have your child do that before attaching the crayon mold.
~Next, she pulled off the foam mounting circles and stuck them to the back of the crayons, then pulled off backing and stuck them to the paper cutouts.

Simple and easy! Stay tuned for my other daughters valentines: Lips and Mustaches!


Friday, February 6, 2015

Gluten Free Coconut Blueberry pancakes

OK, so with the weekend coming I thought a pancake post would be appropriate, especially when that seems to be one of the only times I get the family together to make breakfast. (well not this weekend, we have tournaments all weekend!) But, anyways, this is another oldie but goodie from my old blog, and so I am going to find time to squeeze these in somewhere this weekend. Mmmmm how about breakfast for dinner!

I was super excited the first time I came across coconut flour while shopping for new flour substitutes to try. I love love LOVE basically anything coconut as it is! So, after buying it, I went home and got on the computer and started my research on coconut flour.

OK, so, coconut flour is a soft flour produced from dried coconut meat. Apparently you can make it on your own, but for now i will choose to just purchase it, and not tackle that beast, well, not yet that is! Coconut flour has so many health benefits, being rich in protein and fiber, how can you go wrong :0)

Now here are some things you should know when baking with coconut flour, for one, it is super absorbent. You cannot just substitute coconut flour 1:1 ratio for other wheat or other grain-based flours. You should usually use about 1/4-1/3 cup coconut flour for every 1 cup grain based flour. You will also need to use more eggs, for example, every 1 cup coconut flour you use, you will need to use like 6 beaten eggs in addition to approximately one cup liquid such a coconut milk. I strongly suggest starting out with recipes that people have already used successfully when trying your hand at it at first, instead of just experimenting, as it is not cheap, and you could end up being disappointed, and alot of money down the drain :0(

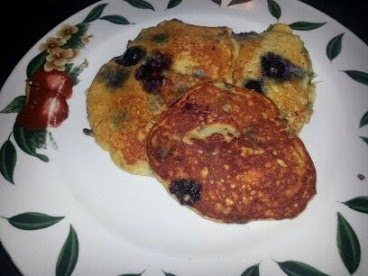
So, speaking of a well used recipe, the first one I tried was one I found for chocolate chip coconut pancakes online. It looked great so I tried it out and it was good, but  I love blueberries so I took the base of that recipe, and tweaked it some, added blueberries instead of chocolate chips, and it was sooooo yummy! (not to mention, I think the blueberries make it a little more moist) I snapped a picture of the pancakes, and as you can see I am not the best food photographer, but delicious doesn't have to mean pretty :0)

So without further adieu, here is the recipe:

Chef Cher's Gluten Free Coconut blueberry pancakes.


5 eggs separated
5 TBSP coconut oil, melted
1/3 cup almond or coconut milk room temp
2 TBSP Honey
1/2 tsp salt
1 tsp vanilla extract
1/3 cup + 1 TBSP coconut flour
1 TBSP ground flax seed
1/2 tsp baking powder
1 cup blueberries
coconut oil cooking spray


Mix melted coconut oil, milk, honey, and vanilla in small bowl. (make sure your milk is room temperature or your coconut oil will seize up)

Mix dry ingredients together in another bowl.

Separate eggs into separate mixing bowls.

Beat egg whites to soft peaks, then beat egg yolks until thick and creamy.

Mix liquid ingredients into egg yolks. Fold egg yolk mixture into egg whites.

Whisk dry ingredients into egg mixture.

Spoon about 1/4 cup batter onto preheated pan or griddle.

Sprinkle blueberries on each pancake.

NOW...this is where the patience part comes in...(which I really lack!!)

Give them a few minutes and until they become kind of puffy before your flip. (my first set were quite messy due to my lack of patience!)

Let me know how they turn out for you!

Wednesday, February 4, 2015

My "dark" secret

So, we generally eat healthy around our house, and I don't buy a lot of sweets, but lately I have been cutting all added sugars which can be quite a difficult task I have come to find. An article I read the other day said that when you set your new diet goals, you should hit it hard at 90% and give yourself a 10% cheat. I liked this idea, and didn't want to go too crazy, but I knew I needed some kind of sweet fix here or there as a reward. So whether you are looking for your own sweet fix, or just want a healthier treat, here is my "dark" secret, so simple, and so delicious!


Yep, dark chocolate and peanut butter!

Here some tidbits on dark chocolate that you may not know:
Lower Blood Pressure

Studies have shown that if you eat small amounts of dark chocolate 2-3 times a week, it can help lower your blood pressure. It improves your blood flow which may help prevent the formation of blood clots. It may also prevent arteriosclerosis (this is hardening of the arteries)

Loaded with Antioxidants

Antioxidants gobble up free radicals, destructive molecules which are known in heart disease and other ailments. Free radicals are implicated in the aging process and may be a cause of cancer, so therefor eating foods high in antioxidants can protect you from many types of cancer and slow down the signs of aging.

Helps control blood sugar

The flavanoids in dark chocolate are said to help reduce insulin resistance by helping your cells to function normally and regain the ability to use your body's insulin efficiently. Dark chocolate also has a low glycemic index, so it won't cause huge spikes in blood sugar levels.

High in Vitamins and Minerals

Dark chocolate also has a number of vitamins and minerals to support your health. In high concentrations includes: potassium, copper, magnesium, and iron. The potassium and copper help prevent against stroke and other cardiovascular ailments. The magnesium helps in preventing type 2 diabetes, high blood pressure and heart disease, and the iron helps aid against iron deficiency anemia. 

And believe it or not, peanut butter has health benefits too! 

Energy
High in calories, but in moderation of course, it packs in the nutrition as well. It contains both protein and healthy monosaturated fats which will give you that great energy pick-me-up you are looking for. Peanut butter also has other nutrients like manganese, tryptophan, and vitamin B3.

Protein

Their are 7 grams of protein in each 2 TBSP serving of peanut butter. The amino acids found in protein are what your body uses to build and repair muscle tissue.  Additionally building metabolism boosting muscles, protein rich foods like peanut butter help you feel fuller longer.

Monosaturated fats

This type of fat can help reduce the bad cholesterol levels in your blood which can help in lowering your risk of heart disease and stroke. It also provides nutrients that aid in developing and maintaining your body's cells. Oils rich in monosaturated fats also add vitamin E to the diet, which is an antioxidant vitamin most Americans need more of.

Potassium

So excess sodium in our diets puts stress on our cardiovascular system, but potassium can counter act the negative effects of sodium. It also helps in heart function as well as  helps your nerves function properly. Consuming 2 tablespoons of peanut butter will boost your potassium intake by 238 milligrams.


Now obviously I am not a doctor, and this is my own research I have done. I absolutely love this treat, whether I indulge in a piece with peanut butter or not, in moderation its great all around! I know alot of people don't care for dark chocolate because of its bitterness, but you can start at a lower percent, like for example I started at 53% cacao (not cocoa). I am gradually working up to get my taste buds used to it. The higher percent the more cacoa, so the best for you is 70% cacao content or higher, rich in flavor and rich in flavanoids.


Monday, February 2, 2015

Guilt Free Flourless Chocolate chip protein blond brownie


OK, so I have a treat for you!! If you need a little sweet fix, without all the guilt, then this is a great recipe, loaded with proteins, and low in fat without all the refined sugars. I tried it on my family (they are my best critics!) 
I told them before we ate it, not to expect it to be super sweet, since it does not have any sugar in it. They took a bite, gobbled it down, and asked for another peice! Then when my kids asked if they could take it to school for a snack the next day, I was super excited. I love finding recipes like this to add to my box of Kirby family approved recipes! I had found a recipe awhile back and altered it a little bit to my liking (and my pantry supply) For example, the original called for peanut butter, and all I had was Almond butter, so I used it and it turned out great, so don't be scared to change it up!

This only takes a few minutes to throw together, and about 30 minutes to bake. You can make them thinner in a square 8x8 pan, or round like mine in a 8" round (thicker)

Get your food processor out and add these ingredients:
1 cup Almond butter (again, you can use any nut butter, or seed butter here)
1/3 cup honey (agave or maple syrup)
1 egg
2 egg whites
1/4 tsp salt
1/2 tsp soda
1 1/2 cups cooked chickpeas
1 tsp vanilla

Now hit the start button, and blend until smooth.
Take the blade out and stir in 1/2 cup dark chocolate chips (I left a few out to sprinkle on top)
Pour into prepared pan and bake about 30 minutes or until your tester comes out clean.